Showing posts with label Missions. Show all posts

Sunday, 12 May 2013

40k Rogue Trader Mission: 'Contact Lost' - Part 2

And so, to the conclusion of this mission. It should be noted that the objectives of this mission were for both sides to claim five hidden pieces of experimental tech and get them and their remaining troops back to their own exit point (dropship for the Imperials, teleport sphere for the aliens). Each side would gain victory points for each piece of tech they got back to their exit point, and lose VPs for each casualty they suffered. Since the numbers on each side were not even, tech devices and casualties were worth differing VPs to each side. But they did all add up so that each side could score and lose an equal amount of VPs.

So, will the Imperials find out what happened at their outpost, or will the aliens succeed in getting away with the experimental Imperial technology? Read on to find out!

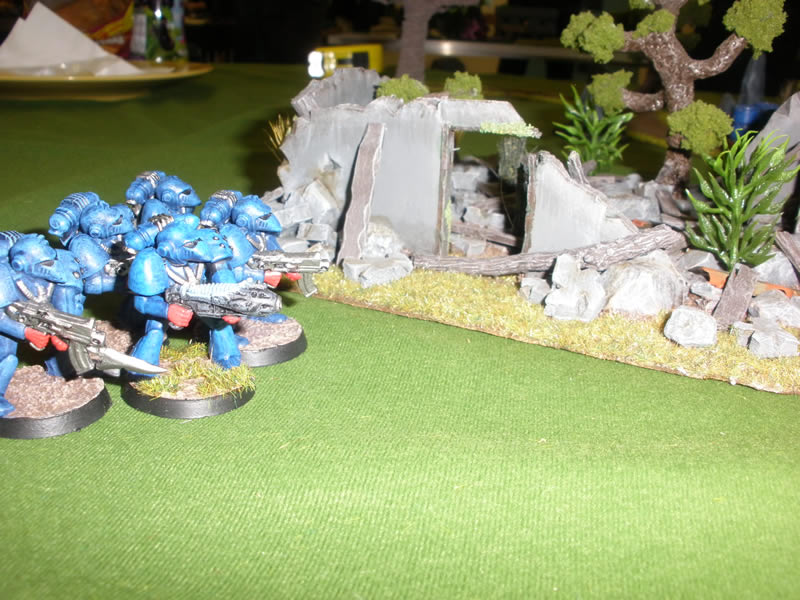
 The Imperials begint to fan out and move into the eerily quiet compound...

Meanwhile on the other side, the aliens advance through Gate 2, past the security bunker...

Some aliens advance into the inner courtyard.

While others sneak around the back of the buildings.

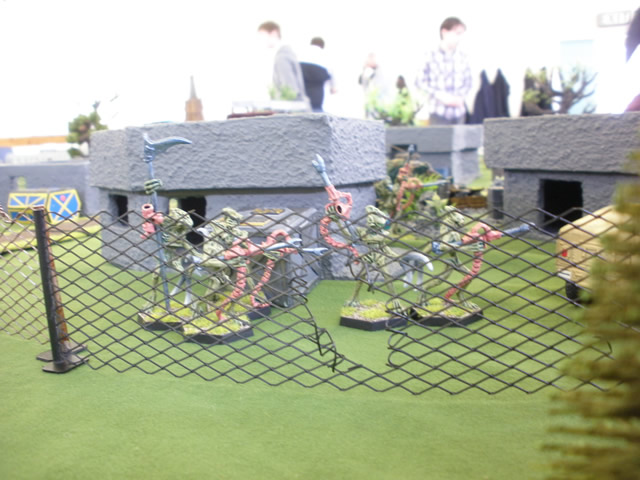
The Imperials make use of gaps cut in the perimeter fence to gain entry.
 

The aliens find their first piece of experimental Imperial tech, but continue to advance, rather than get the item back to their teleport sphere.

Aliens continue to make their way further into the compound, and have yet to encounter anyone else.

A survivor!! Unfortunately this terrified scientist was discovered by the aliens, who quickly killed him.

Another survivor!! This technician is much luckier, discovered as he was by Crimson Fist marines!

Contact! The Crimson Fist rescue team emerge from the building only to discover some hideous xenos lurking outside! They immediately open fire without hesitation, gunning down two rather surprised aliens!

Meanwhile, aliens attempt to outflank their opponents behind one of the buildings.

 The aliens take cover behind a parked Rhino, to shelter from the hail of gunfire unleashed by the marines!

A gun-battle quickly erupts in the middle of the compound!

The Imperial right flank forms a gunline to keep the aliens pinned down...

...While Corporal Bakun gets the VIP out the back...!

 The marines on the Imperial left flank, led by Sergeant Thorson, engage the xenos scum in close combat!

With Thorson's marines is Sergeant 'Tapper's Tapley and his men, 'Tappers' bravely charges the aliens, seeking to emulate the marine's heroism, while his men provide supporting fire.

One of Sergeant Tapley's men heads back to the dropship with vital experimental technology ("...Just looks like a box with wires, boss...")

Thorson and his marine continue to beat back the aliens in close combat, where they are unable to use their powerful plasma weapons.

Sergeant Tapley also has much success in dealing with the xenos, killing another and taking the experimental technology it had stolen.
 
 Unfortunately the second alien used its companions demise to get away!

The remaining aliens continue to cluster behind the Rhino, all the while under fire from the marines.

 The marines and army troopers sense the aliens hesitation, and advance!

One of Thorson's marines makes it back to the dropship with another top secret device (Marine: "Looks like a toaster...with blinking lights..." Pilot: "Maybe it is a toaster...?")

 The Imperial army troopers advance fearlessly!

With the aliens on the run, the marines move up.

The remaining three aliens make it back to their teleport sphere with a tech device for their masters to study. After this, the glowing dome of energy shrank and winked out of existence. It is unknown who the mysterious aliens were or where their teleport techology took them. They haven't been seen since.

And that was that! The aliens lost (unsurprisingly) by a large amount, having suffered 10 casualties and only claiming one device. This was mainly down to Stu's overconfidence, advancing on the Imperials when he should have got the tech devices to his teleporter. It wasn't entirely his fault though, I realised after this game, that the aliens were somewhat outgunned (the Imperials having 5 more models, plus special and heavy weapons), so in hindsight, I think the aliens needed more models and perhaps a support weapon of their own. If anyone wishes to run this scenario themselves, I can provide a google document of the entire mission.

Until next time!


Wednesday, 8 May 2013

40k Rogue Trader Mission: 'Contact Lost' - Part 1

This is the second Warhammer 40,000 Rogue Trader mission I've ran, and it was by all accounts, fun for all involved. My unwitting test subjects were Stu (of Montyhaul's Models) and TJ, Stu commanded the xenos and TJ took control of the Imperials.

The Mission:
"Contact with Imperial Research Outpost P5-GLB, on the forest moon of Bunndor has been lost for reasons unknown. Forces from two factions have detected their distress signal and have been dispatched to investigate. Each has been instructed to retrieve anything worth studying and report back. It is unknown what went wrong, whether the outpost’s staff are still alive, or if hostile forces are involved. The planet is known to harbour a few dangerous life forms, but the outpost’s defences were thought to be sufficient..."
The mission is a retrieval and extraction operation for both sides. There are five objectives ("experimental tech") and both the Imperials and Aliens need to find them and get them off the table. Then they have to withdraw their forces off the table, all the while sustaining as few casualties as possible. That's the idea anyway...

The forces are as follows:
Imperials: 
Brief – Imperial Retrieval Team
"You have been dispatched to Research Outpost P5-GLB to investigate why contact has been lost, whether any experimental technology can be salvaged, check for possible survivors and if possible, discover who (or what) was responsible. You have been provided with a detailed list of items to be recovered, but it is unknown where anything was stored, so you’ll have to search all the buildings. Report back with as many of the experimental devices as you can find, and if possible, clues as to what happened to the base and its staff.
Finally, look after your team and protect your dropship. It’s your only way off the moon!"


Imperial Army – Necromundan 41st Regiment
• 8 Troopers with Lasguns, Knives and Flak Armour (6+ save)
• 1 Trooper with Plasma Gun, Knife and Flak Armour (6+ save)
• Sergeant Tapley (Human Champion) with Chainsword, Laspistol and Mesh Armour (5+ save)
Space Marines – Crimson Fists Chapter
• 6 Marines with Bolters, Bolt Pistols, Knives and Power Armour (4+ save)
• 1 Marine with Flamer, Bolt Pistol, Knife and Power Armour (4+ save)
• 1 Marine with Heavy Bolter, Bolt Pistol, Knife and Power Armour (4+ save)
• Sergeant Thorson (Marine Sergeant) with Chainsword, Plasma Pistol, Knife and Power Armour (4+ save)

Aliens:
Brief – Aliens
"Now that the intolerable noises made by those hairy interlopers have been silenced, the conclave has decided to send your cohort back to their camp to see what they were up to. The conclave has provided a list of their primitive devices that they want you to bring back for analysis, but be careful. If they’ve sent more of their kind to investigate, you may run into some resistance. Don’t get your warriors killed needlessly, and don’t allow any other life forms near your teleport sphere, or they could de-stabilise it, trapping you here."

12 Aliens with Bio-plasma Casters and Repulsor Fields (4+ unmodifiable save).
1 Alien Leader with Nano-Scythe and Bio-plasma Caster (built into the scythe).

I should mention what the alien equipment is, as it is created especially for this scenario:
Alien Weapons:
Repulsor Fields are a type of energy field armour. They grant the user a 4+ save against wounds caused by shooting attacks. However, the user receives no save against close combat attacks (including attacks with pistols) or effects from psionic powers. This save is never reduced by saving throw modifiers, so the user always gets a 4+ chance to save against shooting attacks.

Location
The Imperial research outpost consists of a fenced compound surrounding several small buildings, unusable or burned out vehicles, stacks of fuel drums/crates, plus a watchtower. The rest of the terrain consists of hilly woodland.

Moving with Objectives
Models can pick up objective markers simply by moving over them (so you can move 2”, pick up a marker and move your remaining 2”, all in the same turn). Models may also run while carrying markers, but cannot shoot. If a model is engaged in close combat while carrying a marker, it automatically drops it (place it in base contact with the former carrier). Whoever is still alive after the combat can then pick up the marker. Once a model carries a marker into the transport or sphere, they cannot return to the battlefield.

Deployment
The Imperial transport lands in the south-eastern table corner. The Imperial player may deploy his troops within 5” of the boarding ramp.
The alien teleport sphere is located in the north-western table corner. The alien player may deploy his troops within 5” of it.

Win Conditions
The side with the most VPs at the end of the game is the winner (regardless of whether one side is wiped out). Equal VPs obviously results in a draw.

Game Length
The game lasts until one player gets all of his remaining troops (and their prizes) to his transport/teleport sphere (or one side is wiped out). Or until you run out of time.


 The Imperial Research Outpost:

The Aliens emerge onto the battlefield from their teleport sphere:

The Imperial forces disembark from their dropship and form a perimeter:

Next time...'Contact Lost' - Part 2!

Wednesday, 13 March 2013

Aliens!

I've finally completed the alien force for my upcoming Rogue Trader scenario! There's 12 aliens and one alien leader. I've deliberately not named their species because I don't want them to be any kind of identifiable race (like orks or eldar). The reason for this is to emphasise the way you can use Rogue Trader as a 'generic sci-fi' game; humans vs aliens! Although obviously the human side comprises space marines and imperial army.

This generic sci-fi feel is something I'd hoping to incorporate into other future scenarios. I can't really explain why I'd rather do things this way, but it's something to do with creative freedom I suppose. I like the idea of events being set within the Warhammer 40,000 Imperium that everyone is familiar with, but I want to move away from the 'GrimDarkness' and the 'Endless War'.

Anyway, the aliens!!
The models are actually 'Palansi' from the Cobalt-1 diceless miniatures game. I never played Cobalt-1, but it is by all accounts, rubbish. However, the models are actually quite good, especially these Palansi aliens. I had three blisters of them from some ten years ago, but they're still available from Black Hat Miniatures for a very reasonable £7 for a blister of three.
Aliens!
Closeup
The alien leader
I've created a custom stat profile and weapon profile for them, so they're completely different to anything in the rulebook. They're quite difficult to damage with shooting (the reason will remain a mystery for now!) but up close, they're almost useless!. The aliens are armed with Bio-plasma casters and the leader has a Power Scythe! Ooooh!

Friday, 8 February 2013

Rogue Trader Missions - Retrieval

The next RT mission I hope to run:

Retrieval - Mission Overview:

"Contact with Imperial Research Outpost P5-GLB, on the forest moon of Bunndor has been lost for reasons unknown. Forces from two factions have detected their distress signal and have been dispatched to investigate. Each has been instructed to retrieve anything worth studying and report back. It is unknown what went wrong, whether the outpost’s staff are still alive, or if hostile forces are involved. The planet is known to harbour a few dangerous life forms, but the outpost’s defences were thought to be sufficient..."

Monday, 4 February 2013

40k Rogue Trader: Raid on Fuel Station Zeta-6

This was the first game of Warhammer 40,000 Rogue Trader ever run at Dreamdealers, I intend to run many more of them, when I can get the minis painted! The mission is fairly straightforward, I kept it simple for the first game, as I wanted to make sure I got the rules right! We tried it twice, and although the marines won both times, they were still close games and the marines took a lot of casualties along the way (T3 and a 4+ power armour save in RT!).

Mission Overview:
The rebel forces on the backwater Imperial planet of Lunburg III have taken control of most of the world’s settlements and key installations in less than a year. Although not a particularly populous or important planet, Lunburg III is an agricultural world and thus a vital source of food and other resources like timber and water needed by nearby systems. Imperial forces have been slow to respond, but Space Marines of the Crimson Fists have finally arrived in force to assist the beleaguered Imperial troops in retaking the world. First, the rebels must be deprived of fuel and supplies, so space marine strike teams have dropped in all over the planet with the intention of taking control of or destroying the various supply dumps and fuel depots that are scattered around the hinterlands of the world’s small and only landmass.
Fuel Station Zeta-6, and surrounding hinterlands.
The Space Marines, strike team Dagger 2-8, has been dropped in under cover of darkness two klicks from Fuel Station Zeta-6. The station itself is a small fenced compound with various fuel tanks and stacks of drums full of fuel. Because significant rebel forces are active in the area (these are likely to respond quickly when they hear the fuel station coming under attack), it would be impossible to hold if it was captured, and it’s so far behind enemy lines, the remaining planetary defence forces couldn’t make use of the supplies in any case. Therefore it has been decided that destruction is the only course of action available. Orbital Energy scans revealed that the tanks are protected by an energy field, so long range weaponry won’t work. This, coupled with the fact that the fleet can’t get close enough to destroy them from orbit because of the rebel controlled planetary defence lasers, means that the strike team will have to assault the station, move in past the power field and blow the tanks with explosives.
The fuel station itself, guarded by rebel patrols.

The Space Marines:
• Each marine has a bolt pistol, knife, frag grenades and power armour (4+ save!).
• 9 marines have boltguns.
• 1 marine has a Plasma Gun.
• 1 marine has a Flamer.
• Sergeant Bosco (a space marine Hero) also carries a Chainsword and replaces Bolt Pistol with a Plasma Pistol.
• 2 demolition charges (carried by Bolter armed marines).


The Rebel Militia:
12 men (in 3 units of 4 men) all with Knives, Autoguns and Flak Armour.
• Commander Dhecker (human Hero) with Knife, Autogun and Flak Armour.
Rebel reinforcements - one unit of 5 militia enters a random point on a board edge at the start of each rebel turn. 
 

Crimson Fist marines advance on the compound, one marine is hit and goes down!...


 Rebel militia rush to defend the sandbagged emplacement from the advancing space marines.


Rebel troops take up firing positions on the top of the fuel tanks.


A squad of marines advances past an overgrown ruin.


Rebels decide (perhaps foolishly) to counter-attack, and advance on the marines.


Rebel reinforcements appear and exchange shots with the marines. Both sides suffer casualties on the open ground.


The marines bravely continue to advance in the face of rebel gunfire, and several are killed. Remember, in RT, space marines are only toughness 3 and power armour only grants a 4+ armour save, which is further reduced to a 5+ since Autoguns have a -1 save modifier!


They don't have it all their own way though, as all the rebels on the walkway are blasted by highly accurate plasma gun fire! (plasma guns (and pistols) in RT are "follow fire" weapons, as long as you keep hitting and causing wounds, you can keep taking additional shots at other targets within 2" of the last one).

Despite being the only survivor of his squad, a lone marine continues to advance on the rebel compound.


Sergeant Bosco and his remaining men reach the fence, and chuck their demolition charge into the compound! Rebel Commander Dhecker looks on in horror from behind his barricade!


Despite Commander Dhecker's attempt to reach the demo charge and throw it clear, it explodes and wins the game for the Crimson Fists! (and leaves nothing of Dhecker but a pair of smoking boots). 


All in all, a great first game of Rogue Trader! I'm planning further games involving Imperial Army troopers, the marines of course, a band of Space Ork raiders, and undesirable cult and even some mystery aliens!